November 30, 2011

Guest Post: LIVING LIFE INTENTIONALLY ~ Handprint Ornaments

I'm so glad to have another guest host here at Come Together Kids.  Beth, from  Living Life Intentionally is also a mom of three and her blog is just full of tons of great ideas.  She has crafts, recipes, party ideas, homeschooling lessons and more ~ all organized so you can choose to live your life intentionally without being overwhelmed by the demands of parenthood.

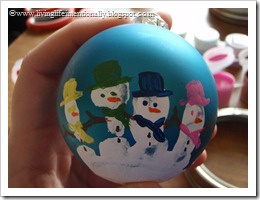
Today she shares some adorable Handprint Snowmen ornaments she made with her children.  You can see the fun her kids had with the project and how cute the ornaments turned out ~ a perfect gift idea for the grandparents ( or yourself! )


November 2011 219


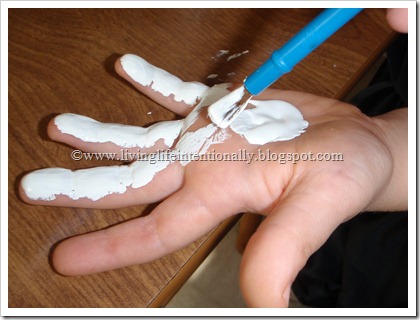
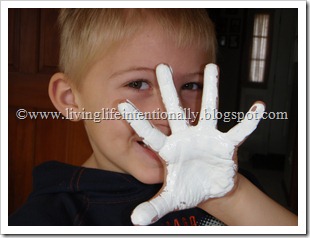
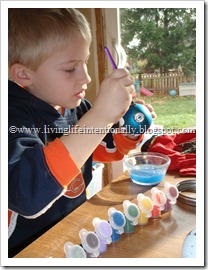
This came out so cute I just had to share it with you!!! First, paint your kids hand white (with Acrylic paint, the Crayola washable stuff just won’t cover very well). 

November 2011 207

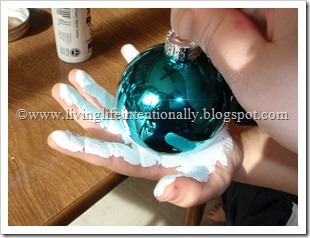
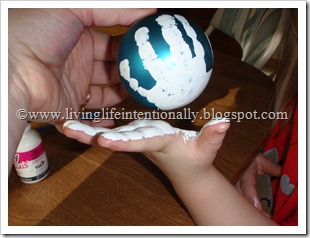
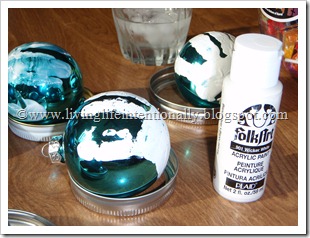
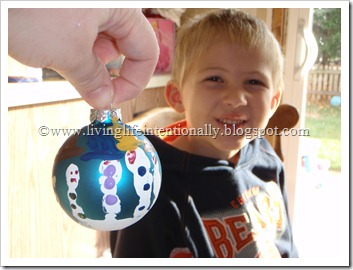
Put the ornament on your child’s hand and have them put their fingers up carefully. Put fingers back out and pull up ornament. Allow to dry (takes less than an hour!). Hint: If you put the balls on lids it keeps them steady. 


November 2011 208
November 2011 206
November 2011 209
November 2011 211

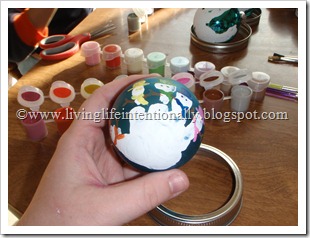
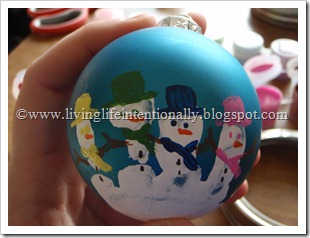
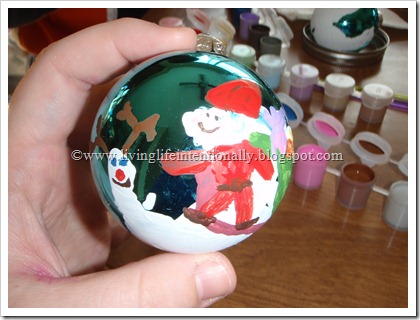
The painting itself was a lot of fun! We used acrylic paint (we tried several different kinds, but this produced the best results). Minnie (almost 4) was not able to do the detailed painting herself, but she did enjoy painting an ornament freestyle. I put the faces, scarves, arms, & hats on Tinkerbell (1) and Minnie’s (almost 4) ornaments. Didn’t they turn out cute!?! I love that you can see their handprint when you look at it from the bottom. If you look straight on, it just looks like 5 cute snowman on a snowy ground. The 9 pack of plain ornaments was $2.50 at Walmart.  Wouldn’t this make a WONDERFUL gift for a grandparent!? ! Plus I am keeping one of each as a keepsake. 

November 2011 215November 2011 219

Here is Goofy’s (6 years old) hand print snowman creation! He did the painting all my himself! I am keeping this ornament for me!! What a precious keepsake!! 

November 2011 212 November 2011 222

Even if the fingers get smushed together (like one of Tinkerbell’s) you still make something cute….something like this. Although I’m sure a more crafty person might have some better looking solutions, but it worked for me.

November 2011 224
       

Thanks so much, Beth, for sharing these cute ornaments and the fun your family had making them.  I'm a sucker for handprint crafts, so I know I'll be making some Handprint Snowmen here with my kids soon.

And readers, make sure you stop by Beth's blog to see some of her other great ideas.



Photobucket

November 29, 2011

Nutter Butter Santa Cookies

I've said it before and I'll say it again, I'm not a baker. However, I do like giving cute edible gifts or bringing a tray of fun little treats to a party.  That's why I loved making these Santa cookies for the holidays last year.  (I got the idea when a friend had posted a similar version on her Facebook page using red colored sugar for the hat, but I decided to go with red melting chocolate on the hat and add some coconut on the beard.) 

They're perfect for a Christmas party, but require no baking and use all store bought ingredients  (My kind of baked good!)  


Here's what you need:

  • Nutter Butter Cookies (could also use Pepperidge Farm Milano cookies, Vienna Fingers, or other oval-shaped cookie)
  • White melting chocolate disks
  • Red melting chocolate disks
  • White Chocolate chips
  • Mini chocolate chips
  • Cinnamon Red Hots candies
  • coconut flakes (or plain white sprinkles)

Here's what to do:


 1.  Dip each end of your Nutter Butter into the melted white chocolate.   I have this Wilton Electric Melting Pot and I love it ~ makes it super easy to melt your chocolate disks and then keep the melted chocolate the right temperature for dipping (even if you get slowed down by helping kids!)  

NOTE: If you're making a bunch of these, I'd recommend dipping no more than 8-10 at a time so the chocolate doesn't harden before you can sprinkle on the coconut.


2.  While the white chocolate is still "wet", sprinkle some coconut flakes on the bottom part for Santa's beard.

Top and bottom dipped in white chocolate and Santa's coconut beard in place.

3.  Let the white chocolate cool and harden while you melt your red chocolate disks.  Then quickly dip part of the top in the red melted chocolate, leaving part of the white showing.  


4. While the red is still "wet", press a white chocolate chip on the side to make the pom-pom on the end of Santa's hat.


With the hats and beards done, he's ready for the final touches.

5.  Using a bit of melted chocolate or frosting, add two mini chocolate chips for eyes and the cinnamon red hot for a nose.  ( I just used a toothpick to add a tiny bit of melted chocolate then attached the eyes and nose)


That's it!  Super cute and super easy (but lots of fun and very festive!). 


November 21, 2011

Christmas Countdown Tree

 This post was originally shared at Under the Table and Dreaming 
as part of the Styrofoam Brand Foam Handmade Holidays series.
I was provided with the Styrofoam materials 
in exchange for creating and sharing this project.


One thing I've learned having young children 
is that they LOVE to count down to special occasions.  
Whether it's a holiday, birthday or special trip, 
they will constantly be asking "How many more days?"  
So when I was invited to create a holiday craft using 
STYROFOAM Brand Foam, I knew just what I wanted to make ~ 
 a special Christmas Countdown Tree for our mantle.


Here's what you'll need:

  • STYROFOAM Brand Foam:
    • One 18"x12"x1" white block
    • Twenty-four 1" balls
    • One 4x1/2" white star
  • Green fabric ( I used three fat quarters )
  • Brown fabric ( just a little bit )
  • toothpicks or sharp pencil
  • acrylic paints
  • Extra long ball head pins ( 1 3/4" long )

Here's what to do:

1.  Start with your white block of STYROFOAM Brand Foam, your green fabric and a toothpick.

2.  Lightly sketch a tree shape on the white block of STYROFOAM Brand Foam and cut it out with a sharp knife.


3.  Now take your green fabric and cut it into squares (approx. 1 1/2").  I used pinking sheers to make them a bit more pine-needle like, but I don't think it's really necessary.  (It's also not necessary to iron your fabric or be precise when cutting your squares!)


4.  Now, let's turn this all into a cool looking tree!  Take a square of fabric and pinch it onto the end of your toothpick (or sharp pencil, etc.).  Then use the toothpick to push the fabric into the STYROFOAM Brand Foam tree shape ~ no glue needed!


5.  You'll want your pieces pretty close together so they completely cover the tree shape.

  
6.  I just have to share how much my girls (ages 6 and 9) LOVED helping with this step.  All I had to do was start the bottom few rows, take a second to show them how to do it, then step back while they finished the rest of the tree!


7.  When the front and sides of your tree are completely covered in fabric, cut a few strips of brown fabric for the trunk.  (mine were approx 1/2" wide) and wrap them around the trunk of the tree.  Just use the toothpick to press in the ends of the fabric to attach it.


8.  At this point, your tree looks pretty good.  The texture of the ruffled pieces of fabric actually resembles the needles of a Christmas tree.  You could easily keep your tree looking just like this and  it would be lovely.  However, with three kids, I knew I wanted to make mine a little bit more colorful and interactive.


9.  To make ornaments, you'll need your 1" balls and 4 1/2" star of STYROFOAM Brand Foam.  Using acrylic paints, paint each shape with the colors of your choice.  I found that it was super easy to paint the shapes using a foam brush and dabbing the paint on.


10.  I debated the various ways to attach the colorful ornaments and star to the tree.  In the end, I found that using extra long ( 1 3/4" ) ball head pins worked great.  They're long enough to go through the 1" ball and then stick into the tree without going through the back.  It's also easy to remove the balls later.


11.  When the month of December starts, we'll take turns adding one of the 24 ornaments each day and then top our tree with the star on Christmas morning. 


I'm so pleased with the way our Christmas Countdown Tree turned out and I can't wait for December 1st so we can begin using it.  I also learned two things working with STYROFOAM Brand Foam... 

1. My girls and I loved the texture we created by pushing fabric into the foam.  Without a doubt, we'll be using this technique on other projects ~ I'm thinking wreaths and even cutting sheets to make their initials.  

2.  I was surprised how easy it was to paint the pieces STYROFOAM Brand Foam.  I know I'll be purchasing all sorts of different shapes and sizes now and painting them to fit my project needs.


Stop by Stephanie Lynn's spectacular blog to see the rest of the projects created for this series!


UndertheTableandDreaming


Sharing our tree at: 

November 20, 2011

Five Fun Ideas for Christmas Magic

As a parent, one of the best parts 
of the Holiday season 
is seeing the magic of Christmas 
through my children's eyes.  
Here are Five Fun Ideas 
to help spread that Christmas magic.


1.  Magic Santa Key
   { East Coast Mommy }

Don't have a chimney or fireplace for Santa to use?
No need to worry, just hang this special key 
on your front door and Santa 
will have no problems getting in to deliver his presents.


{ Portable North Pole }


I've done this for my kids for the last few years 
and they absolutely LOVE it.
Remind Santa of a few facts about your child
and they'll be incorporated in a video message 
from Santa himself that is emailed to you for FREE.


Screenshot of TheSantaVideo.com Video Creation 


Here's another way the wonders of technology 
help keep the Christmas magic alive.
With a quick photo upload and a few clicks,
Santa's elves will take a video of Santa delivering presents
in your VERY OWN HOUSE!!!

(I'm definitely doing this once our living room is decorated)

* NOTE: This video is not free, but there's a link on their homepage
where you can get $4 off, making it only $10


4. The Elf on the Shelf
{ here at Come Together Kids }


I shared a post last month about the fun 
we have with our Elf on the Shelf.
We're excited for him to make his appearance 
again here after Thanksgiving.


5. Rudolph's water and the Reindeer's carrots


Here's a little bit of Christmas magic 
that happens at our house every year.
Not only do we leave out cookies and milk 
for Santa in our living room,
but we leave some carrots and a bowl of water 
on our back deck for the reindeer.
All the Christmas Eve deliveries 
must make them hungry and thirsty,
because on Christmas morning 
we see that the carrots have been nibbled on
and Rudolph's red nose has tinted the water red.

(must be that food coloring Santa puts on Rudolph's nose 
to make it extra red and shiny for his special night;) )


Sharing Christmas Magic at:
Tip Junkie handmade projects
Making the World Cuter
C.R.A.F.T. 
Craft-O-Maniac 
Homemaker on a Dime
Under the Table and Dreaming 
Brassy Apple 
The Girl Creative 
Sumo's Sweet Stuff 
Sugar Bee Crafts 
Today's Creative Blog 
Blue Cricket Design 
Milk and Cuddles
I heart Naptime 
Skip to My Lou 
Sugar and Dots 
Someday Crafts 
Somewhat Simple 
Gluesticks 
Tatertots and Jello

November 19, 2011

Three Huge Milestones


This month I hit three big milestones
here on the blog.

Milestone One ~ I just passed 1,500 followers through Google Friend Connect!  It thrills me that so many people have liked my ideas enough to follow the blog.  (I'm also thrilled that I can share those ideas with such a large audience without having to overcome any fears of public speaking and all while I sit here in my pajamas late at night ~ blogging is such a cool invention!)


Milestone Two ~ Come Together Kids just passed ONE MILLION pageviews according to my Blogger stats!!   This milestone just totally blows my mind.  I started the blog in August of 2010, shared 15 posts, then put it on the back burner until January 2011.   That means that the majority of those pageviews have been in less than a year.  Crazy, isn't it?   (My Google Analytics stats are somewhat lower, but I didn't get that set up until May 2011)


Milestone Three ~ Okay, this one I didn't quite hit yet (but I'm really close and it sounds better to have three milestones instead of just two!).  I am *almost* to 2,000 "likes" on the Come Together Kids Facebook Page.  As of this posting, I'm at 1966. ( and if you aren't a Facebook fan yet, come "like" me now so I can hit this last milestone! ;)  )

One of those likes is me, so I'm not counting that one!


So what does this mean?  Well, nothing really.  There's no big balloon drop or confetti cannons.  I don't have any fancy giveaways or special prizes.  Instead, I would just really love your input.  I like to think that I must be doing a pretty good job with the posts I'm sharing, or those numbers wouldn't have been steadily climbing over the past several months.   However, I have a little poem that I learned when I was younger that I sometimes share with my kids...

Good, better, best,
never let it rest,
until your good is better,
and until your better's best!


I don't want to rest here just being good.  I want to continue to improve Come Together Kids so it can become better and better, then work some more until it's the best I can make it.  

So please, if you have any suggestions of things I can do to make this blog better, could you take a minute and let me know. (either in a comment or email me at ComeTogetherKids(dot)hotmail(dot)com. ) 

Perhaps there's something I can do to make the blog easier to navigate or a feature that might be missing? 

Maybe you'd like to see more of a certain kind of post or less of another? 

There are so many things about blogging that I'm slowly learning as I go along and there are still so many things that I'm just clueless about.  So if something here has been kind of bugging you, let me know.  ( Just try to give any criticisms or suggestions in a fairly constructive way, please! ) 


Okay, I'm done tooting my own horn.  Now I'm ready hear your suggestions and advice on how I can make Come Together Kids even better.


Related Posts Plugin for WordPress, Blogger...