December 19, 2013

Fun with LEGO Minifigure Families

This is a Sponsored post written by me on behalf of LEGO for SocialSpark. All opinions are 100% mine.

Sending of lots of Happy Holiday wishes from us here at Come Together Kids!


How cute is our little Christmas postcard?  All of us are smiling and facing forward, our house is clean, there's a roaring fire in the fireplace and all our holiday decorations look great!   Aren't you impressed that this busy mom pulled it all off just days before Christmas?

Seriously, though, I had so much fun designing our cute little scene and it only took me a few minutes on the LEGO Minifigure Family website.

First, I simply added each member of our family, even our cat.

Then, I was able to customize each person.  I could change our skin tone, facial expressions, hair, and outfits.  Here I am with a nice smile on my face,  my hair nicely brushed,  and wearing a cute Mrs. Claus outfit.

The final touch was choosing the background scene and moving each of our LEGO minifigures into position I opted for a nice home scene, but there were several fun scenes to choose from.


When you're all finished, you can share your creation in an email, on Facebook, Twitter, and Pinterest, or even download and save it!  Then you can go back on the site and make a bunch of other fun variations.

Check out my girls in their ski outfits at the North Pole and my son as a Yeti...

And now they're on a tropical beach ready to do some snorkeling...

Seriously, I could have fun with this for hours.  Check out the video if you'd like to make one for your own family.  It's perfect for LEGO fans, but also lots of fun for just about anyone.  (and it's FREE!!)


Visit Sponsor's Site

December 15, 2013

Eating Frozen Fruits and Veggies (and feeling good about it)

This is a Sponsored post written by me on behalf of Frozen Food Foundation for SocialSpark. All opinions are 100% mine.

I don't know about you, but taking all three of my kids with me to the grocery store is one of my worst nightmares.  When they were younger and I was staying home with them, the thought of loading everybody up in the car to go hit the aisles of the supermarket was like torture.  Now that they're older, they still don't want to be stuck in the grocery store with me and their school and activity schedule, combined with my work schedule makes it just as tough to have to run to the supermarket all the time.

That's why my freezer comes in handy.   I've learned that if I have what I need on hand, I can minimize those dreaded trips for last minute items.  I'll make up a bunch of pancakes and french toast to have on hand for breakfasts.   I'll buy meats and freeze them and even make up double batches of some of our main dishes so we can eat one and freeze the other.   I always wondered about the frozen fruits or veggies, though.  I knew it would be easier if I could keep the freezer stocked with those items too, but would they have the same nutritional value if frozen?


Luckily, this a recent study answered my question and helped put my mind at ease.  A study conduced by the Frozen Food Foundation and University of Georgia  tested a variety of fruits and vegetables most commonly purchased by families:   broccoli, corn, strawberries, blueberries, etc.  The researchers tested the produce under three different conditions:  frozen, fresh (on the day of purchase) and fresh-stored (after five days in a home refrigerator).   The study found that in many cases, the frozen foods retained more Vitamin A, Vitamin C, and folate than those which had been purchased fresh and stored for a few days before eating.   Fruits and veggies consumed right from the fields are awesome, but when you factor in the time from the farm, to the store, to your dinner table, frozen foods often have the advantage.  More details of the study (and other similar research) can be found by click on the link at the start of this paragraph or by visiting the Frozen Food Foundation Facebook  page or the Frozen Food Foundation Twitter  page.

A few of my favorite ways to use frozen fruits and veggies...

* frozen veggies and sides? right from the package as a quick and simple addition to our main dish

* frozen veggies? added to homemade soups and casseroles

 * frozen chopped onions?  They're just awesome.  So much easier than chopping regular onions everytime you need them for a dish.

* frozen edamame?  great in the kids' lunches.  I just put a handful still frozen in their lunchbox and it's thawed by lunchtime.

* frozen meals?  great for my lunches when I'm called in to sub at the last minute or when dinner plans unexpectedly change

* frozen fruit smoothies?  great for an after-school snack.  We take a handful of frozen fruit (strawberries, mixed berries, peaches, etc), add some lowfat milk and about half a packet of instant pudding mix.  Blend until everything is combined.  It's really yummy and the frozen fruits make it nice and chilled and the pudding mix makes it really creamy and sweet.


So there you go.  If you were like me and were worried that frozen fruits and vegetables were not as nutritional as fresh, you can rest assured that in most cases, they are just as healthful and sometimes even more. 


Visit Sponsor's Site

October 7, 2013

Tie Dye Cake

Lately for birthdays, I've just been making cupcakes and putting them on simple little homemade cupcake stands.  I can match the stand to the party's decor and it's a lot easier to frost a cupcake than it is to try to decorate a cake.  However, for my daughter's Tie-Dye Birthday Party, I decided to try my hand at making an actual Tie-Dye cake, instead of just cupcakes.  I happened to find this Shirt Cake Pan in my basement when I was looking for other party supplies in my basement, and it ended up working out perfectly.  Of course a regular cake shaped pan would be just as cute.

Check out our Tie-Dyed Cake...


Pretty cute, don't you think? 

Here's what you'll need (feel free to make any of this from scratch, I just used store-bought supplies)...

* box of white cake mix + ingredients to make it
* 2 containers of white frosting
* shirt cake pan or any other shape (I happened to get mine years ago at a garage sale and it seems Wilton no longer makes them, but you could check Ebay or Amazon (affiliate link)for used ones, or just make your own shape from a regular sheet cake pan)
* food coloring

Here's what to do...

1.  Mix up your white cake mix according to package directions.  Separate the batter into 4 separate bowls, then add food coloring to each bowl to make the colors you want  ( I think I used about 15 drops of coloring in each bowl)


2.  Pour your batter into your greased cake pan.  I just did a little bit of one color here and a little bit there, until the whole pan was filled with random blobs and swirls of color.


3.  Bake according to package directions and allow to cool.  Then invert your cake onto the tray that you'll be using for serving.  (Don't worry if the colors look a little brownish and muted, they're nice and colorful inside the cake.)


4. Spread a fairly thin layer of white frosting all over your cake, then divide your remaining frosting into separate bowls and tint with food coloring.


5.  Use a toothpick to sketch a rough tie-dye swirl design in your frosting.  (My photo of the toothpick sketch was too faint, so I've drawn on the design I followed)


6.  Add your tinted frosting to your cake following the swirl design you sketched.  I put all my colors on first, then filled in the sections so the colors were touching.  (Notice my fancy cake decorating plastic spoon, I told you I don't decorate cakes often! ;)  )


7.  Finally, use the end of your fancy cake decorating spoon to draw the color from one swirl to the other, wiping off the spoon after each time.


8.  That's it!  Stick in some candles, serve your colorful cake to your birthday kid and be proud of your handiwork.


Oh, and things were way too hectic at cake serving time to get a well-photographed shot of the tie-dyed inside, but here's a quick, somewhat blurry, photo I grabbed before the girls came back inside and I had to start cutting seconds.


You can read about all the other details of our Tie-Dye Birthday Party HERE!

October 4, 2013

Make-Your-Own Lollipops

We made these yummy lollipops at my daughter's recent Tie-Dye Birthday party.  They were a fun little treat for the girls, but they were so easy, they'd be a fun little treat to make anytime.

Check them out...

Make your own lollipops with Jolly Ranchers

Now look at how easy they are to make!

Here's what you need...

* Hard candy (photo shows Jolly Ranchers and Lifesavers, but I found that the Jolly Ranchers "melted" the best)

* parchment paper (affiliate link) - found in the baking aisle

* a hard object (to smash the candies)

* sturdy plastic bags (small freezer bags worked great)

* lollipop sticks (affiliate link) - found in                                                   the cake decorating section of most craft stores


Here's what to do...

1. Unwrap your candies and separate by colors in your plastic bags.  Close up your bags then use a hard object to smash your candies into smaller pieces.  ( I used a large wrench ).  You don't want to pulverize them into candy dust, but a variety of smaller-sized chunks.  


2.  For our party, I put the crushed candies in a divided tray so the girls could easily scoop out each color, but you could just go straight from the plastic bags if you want.


3.  Cut a piece of parchment paper to be the size of your cookie sheet, then draw circles with Sharpies to be the guidelines for your lollipop size and placement.  (they do spread out a decent amount, so leave some room between each lollipop)  Flip your parchment paper over so the actual marker circles are underneath, but you can still see the shape - that way the Sharpie doesn't bleed onto your actual candy.


4.  Preheat your oven to 225*.  Then allow the kids to scoop out the colors/flavors of the choices and mound them onto the circle shapes.  If you're doing this with more than one kid, allow them to write their name in Sharpie next to their lollipops.


5.  Put your tray into your preheated 225* oven for approximately 10 minutes, or until candies are melted.  


6.  Carefully take out your tray and immediately add your lollipop sticks, rolling them in the melted candy to completely coat the top part of the stick.  Note:  The lollipops will harden quickly, so move pretty fast with this step.

You'll notice that some lollipops were unevenly melted, that was the Lifesavers candies.
I'd recommend just sticking with the Jolly Ranchers, or doing a test batch 
with other varieties of candy.

7.  The lollipops will be cooled and hardened in less than 5-10 minutes.  Just peel them off the parchment paper and they're ready to enjoy!

Sharing our lollipops at:
Tatertots and Jello
The Frugal Girls

October 2, 2013

How to Tie Dye with Acrylic Paints

When we were brainstorming different ideas for my 8-year old daughter's birthday party, we quickly settled upon having a tie dye theme.  In case you haven't been around 8 year olds lately, they can be all about tie-dye, peace signs, hearts and rainbows, so it seemed like the perfect plan.

However, once I thought about it a little more, I was worried it would be tricky to pull off.  Regular tie-dying often involves presoaking the fabric, dying it, wrapping it up and waiting several hours before rinsing it out.  That definitely would be tricky to pull off in a 3-hour time frame for our party.  Plus, it's often recommended to use 100% cotton fabrics, and that would rule out the pillowcases and socks we were hoping to tie dye.

Luckily, we decided on an alternative that worked out really well...  using watered-down acrylic paints instead of regular dye.

Check it out...


That rainbow of bottles was filled with the watered-down paint that was really easy to use and all those colorful shirts and pillowcases were ready to take home at the end of the party.  (NOTE:  They were still a little damp, but we simply put them in plastic bags as the girls left and they hung them up to finish drying when they got home.)

Here's what you'll need:

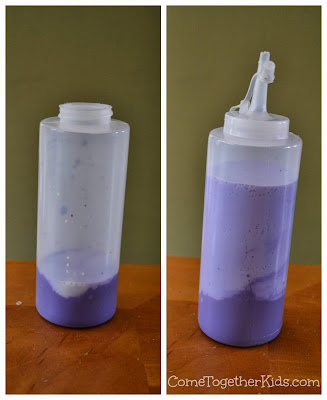
 * plastic squeeze bottles ( found ours in Walmart in the food storage section, but spray bottles could also work)

* acrylic paints (they're available in tons of colors and are often less than $1 a bottle)

* fabric textile medium ( found with the acrylic paints in most craft stores)  Optional but I'd recommend it

* smocks and containers to catch the paint (We use disposable lab coats as smocks and they're awesome!)

* variety of items to dye ( we did pillowcases, t-shirts, and socks) and rubber bands


Here's what to do...

1.  Add the water and fabric textile medium to your acrylic paint.  The textile medium is optional but it helps to soften up the paint so the shirt is not as stiff when it's dry.   For each of the colors, I poured  one bottle of acrylic paint and half a bottle of the textile medium into the squeeze containers.  Then I filled up the empty acrylic bottle three times with water and added that in.  (So the ratio is 1/2 part textile medium, 1 part paint, 3 parts water - but you can experiment with your own ratios)  Then shake well to mix. 


2.  Repeat with the other colors you'll be using on your shirts, pillowcases, etc.  (That's the other awesome thing about using acrylic paints, there are sooo many colors available so it's a lot easier to find the perfect colors for you)


3. If you're doing this for a party or group of kids, you'll want to get all your supplies together and try to minimize the mess.  Because the paint will stain clothes once it dries, I gave each of the girls a smock.  I actually used these disposable lab coats (affiliate link) and they worked great to really cover all their clothes. 


I covered my tables with plastic tablecloths.  Then  put out bowls of rubber bands and some spray bottles on one table and then the paints, trays and rubber gloves on another.

4.  Next it was time to get dying!  I had the girls lightly mist their shirts, pillowcases or socks with a spray bottle of water, then put on the rubber bands.   (I had to help some of them with the rubber banding step)  Once everything was all tied up, they were ready for the color.  I instructed the kids to hold the tip up the bottle right up against the fabric so the color went into the fabric instead of squirting everywhere, but we did do each color over the disposable pans so I could collect any extra paint and put it back in the containers.


A few tips I gave the kids...

* Try to stick to two or three colors for the best effects.
* Try not to put yellow/purple, blue/orange, or red/green next to each other or they may mix together to make a yucky brown.
* Try to make sure you get plenty of paint in each area, but not so much that it's dripping off or it'll run into the other colors.

5.  When the items were dyed, we put them on plastic trays and tablecloths to soak in and set the colors.  After about an hour, I took off the rubberbands and held up each masterpiece so the kids could "oooh" and "ahhh" as their designs were revealed.  I hung up each piece so it could dry a little before it was time to take it home.

(NOTE:  Most of the items were just wet, but some of the girls went a little overboard and their items were still pretty sopping wet when I undid the rubber bands.  I simply squeezed them a little with an old towel to sop up some of the extra liquid so they weren't actually dripping onto my deck while they dried.)

Our finished products...


I instructed the parents to allow the items to dry then throw them in the dryer to heat set the colors.  After that, you can wash the items just as you would your regular t-shirts or pillow cases.

One final note about fabrics.  One of the good things about acrylic paints is that they'll "stick" even if the fabric is not 100% cotton.  Some of the pillowcases we used were a 60/40 cotton blend and others were microfiber (all synthetic).  The colors on the microfiber ones didn't seem as bright as on the cotton blend.  It may have been the combination of colors used, but I'd recommend staying away from microfiber items or testing it out first if you want more vibrant colors. 


Check out all the other fun foods and activities from our Tie Dye Birthday Party HERE.

Sharing our tie dye tips at:

October 1, 2013

Trix Krispie Treats

I made these yummy treats for my daughter's Tie-Dye themed birthday party because the colorful swirls had a tie-dye effect.  However they were really yummy and super easy, so I know I'll be making them often as just a regular treat.

Krispie Treats made with Trix - so fun and colorful

The recipe is really simple because they're basically just Rice Krispie Treats, but with Trix cereal instead.

Here's what you need...


* 6 cups Trix cereal ( I used the swirls one)
* 1 bag of marshmallows
* 3 Tbsp. butter


Here's what to do...

In a large saucepan, melt the butter over medium heat.  Add the marshmallows and stir often until they're completely melted.  Remove from heat and stir in the cereal.  Using a greased spatula, press the mixture into a greased 9 x 13" pan (or you can use a smaller pan for thicker treats).  Allow to cool, then cut with a sharp knife.

Trix Krispie Treats


And here's the finished treats - easy, colorful, and really good! 

Trix Krispie Treats - fun and colorful alternative to regular Rice Krispie Treats

Tie Dye Birthday Party

Last week my "baby" turned 8!  To celebrate, we had a small party here at the house with a tie-dye theme.  My birthday girls and her friends had a fun time, had some yummy and colorful treats and left with some cool little projects.  In this post I'll share an overview of the party's projects and treats, with links to full posts with all the details.  (Click on the photo or the links in the descriptions for the full posts!)


First, let's start with the food...

Though I have very little cake decorating experience and have been just making cupcakes for all of our recent parties, I did make this tie-dye cake that turned out pretty cool.  

How to make a tie dye cake

I just used boxed cake mix, canned frosting and food coloring and I only used a regular rubber spatula and spoon for the decorating, but it turned out well enough to impress a bunch of 8 year olds.  The inside of the cake is even "tie-dyed" as well ~ pretty cool!  (Full post HERE)

 I also made some Trix Krispie Treats.  They were super easy to make and much more colorful than regular Rice Krispie Treats (yummier than the regular ones too!)  They even had a tie-dye effect with the swirls in the cereal pieces.   (Read the full post HERE)

Trix Krispie Treats (colorful and perfect for a rainbow or tie-dye party)


Our next treat was actually a combination of a party activity and a yummy sweet to take take home.  We made our own lollipops.  They weren't quite tie-dye, but they were colorful and fun to make.  (HERE's the full post with the easy directions)

Make your own lollipops with Jolly Ranchers


Finally, to counteract all the sweets that we were going to be eating, I served some fruit too.  Since I was already using my divided container for the make-your-own lollipop station, my daughter and I decided to use the shirt cake pan as a fruit tray.  She even helped me arrange the berries and grapes in a tie dye pattern.

"Tie Dye" Fruit Tray


If you squint your eyes just right, it kind of has a tie-dye effect, doesn't it? ;)

Now of course, a tie-dye party wouldn't really be a party without some actual tie-dying, right?  For the main event, each girl had the chance to dye her own t-shirt, pillowcase, and pair of socks.   I wanted to make sure everything would be ready to take home at the end of the party, so using regular dye was ruled out.  ( Most dye kits require pre-soaking, then waiting several hours after dying before unwrapping and rinsing. )  Instead, we used watered-down acrylic paints as our "dye".   We were able to choose from a whole variety of colors, we didn't have to use 100% cotton items, and everything was ready to go at the end of our 3 hour party!  (Full post with directions can be found HERE)

Check out the fun...

How to Tie Dye using Acrylic Paints

Get all the directions for tie-dying with acrylic paints HERE!

Overall, the party was a huge hit.  The girls were happy with their finished projects and they enjoyed all the little treats.

 Sharing our party at:

August 28, 2013

First Day of School Memory Page

This is a Sponsored post written by me on behalf of BIC® for SocialSpark. All opinions are 100% mine.

Most nights at the dinner table, I ask my kids about their day.  Even though the questions are pretty simple ~ "Tell me one thing that made you smile today",  "What was one thing that you were proud of?", "Tell me one thing that made you sad", etc. ~ their answers will vary day to day and they actually give me a pretty good indication of how things are going with both their classes and their friends. 

For the first day of school this year, I wanted to capture some of their answers as a little memory page.  I made a space to put one of the "first day photos" I took before they left for school and included some of our regular dinner time questions as well as a few about their new grade. 

Check it out...

Even though they're not too excited to start actual homework, they didn't mind sitting down with some new colorful BIC Atlantis® pens (and a plate of brownies) and recording a few thoughts about their first day.

Their responses are cute, colorful and the page will be a nice little keepsake to be filed away with their school work for the year. 

Of course, after they finished their questions, I had my own First Day of School paperwork to fill out ( times three!).  I didn't get to use a colorful pink or purple pen, just a regular black BIC Atlantis®, but there is something kind of exciting about some fresh new pens and a fresh new start to a new school year.


If you want to add a little excitement to your Back-to-School paperwork, BIC® is sponsoring a cool sweepstakes.  Check it out...

Check out their Facebook page to enter... BIC Back-to-School Instant Win

No Purchase Necessary. U.S. only. 18+. Ends 9/2/13


Visit Sponsor's Site

Related Posts Plugin for WordPress, Blogger...