February 21, 2013

Walking Tacos (aka Tacos in a Bag)

I first saw these "walking tacos" at an amusement park concession stand several years ago.  It's such a smart idea ~ putting the taco fixings in a snack size bag of chips.  However, I'd pretty much forgotten about them until my oldest went to a birthday party recently.  She came home telling me all about the "tacos in a bag" that she'd had and was begging me to make them for our family.  Well, her wish came true for dinner last night when I made them for me and the kids.  We ate ours sitting at the dinner table, but this would be the perfect food for a bbq, tailgate or any time you're on the go and don't want to have to sit down to eat.

Check it out...


So simple!  All you need are individual bags of chips, taco meat, and fixings.  (We liked Doritos for our chips, but Fritos, Sun Chips or other similar chips would also work.)  Crush the bag slightly to break the chips into smaller pieces, then add your fixings, grab a fork and enjoy!


While not the healthiest dinner, they were definitely yummy and a fun treat.  I'm sure we'll be making them again, especially in the summer when we have friends over and we're in and out of the pool.

Sharing at:

February 20, 2013

Great Wolf Lodge Review and Tips (Williamsburg, VA)

A couple weeks ago I took the kids to the Great Wolf Lodge indoor water park in Williamsburg, VA.  It was just an overnight trip that was a combination of a good-report-card treat, early Valentine's gift, and Mommy-got-a-good-deal-on-a-Groupon!.  The kids and I (plus their grandma) really enjoyed our little mini-vacation.  Since there are several Great Wolf Lodges around the U.S. and Canada, I thought I'd share our experiences and pass along a few tips in case you're thinking of planning a trip to one.  

(NOTE: This isn't a sponsored post and I wasn't reimbursed in any way.  I just think it's helpful to get some extra info before spending lots of hard-earned money and wanted to pass along our thoughts)


Check out our stay (list of tips at the end of the post) ...


The main feature of the lodge is the large indoor waterpark and that's where we spent the majority of our time.  The passes for the waterpark are included in your room costs and it's only available for use by guests staying at the hotel.  (which helps to control the size of the crowds).  However, guests are free to use the facilities starting at 1pm on the day they check in and the full rest of the day after their 11am checkout.

When you enter the waterpark there's a large climbing structure in the center.  There are all sorts of nets, tunnels, slides and ways to dump and squirt water on those around you.  There's also a huge bucket of water that dumps out 1,000 gallons of water on the people below every 5 minutes.  (My kids LOVED the pouring water and would run over to stand under it when the warning bell went off)

Great Wolf Lodge reviews

The large wave pool was also a big hit with my kids.  They liked floating on a raft in the middle or being at the edge where the waves were breaking.  It was nice to have that beach experience without any sharp shells poking your feet or sand getting in your suit!

great wolf lodge reviews

There were lots of other fun attractions too ~ floating logs to hop across, a surfing simulator, shallow kids' pool and slides, hot tubs (one for adults and another for kids), and a lazy river.


There were also several large waterslides that I don't have pictures of, although I did ride them each several times!  (You can see the resort photos of them HERE.) My son declared the Howling Tornado, with its big drop into a huge funnel, his "favorite ride ever, anywhere!" and I have to agree it was really cool.  We also liked the River Canyon Run with its darkened tunnel and flashing lights and the Alberta Falls where you twist and turn down one of two large slides.  Even the two smaller water slides off the central climbing area were lots of fun.

 While the cost for our whole little trip, even with a Groupon, was a few hundred dollars, it was definitely a fun and memorable trip for the kids and a really special treat.  I couldn't afford to go back often, but we'd love to return again at some point.


Now for the tips and a few things worth mentioning...

  • If you can arrange it, try to go on a weekday.  We stayed Sunday into Monday and the crowds were manageable.  The longest lines (approx. 20-30 minutes at times) were for the Howling Tornado, River Canyon Run, and Flow Rider surfing ride.  Most of the other areas you could go right into.  I've heard it can be much more crowded on weekends.
  • Take advantage of the online check in.  I didn't and had to wait in a really long line to check in on Sunday afternoon.  I noticed that people who had done the online check in were able to go into a much, much shorter line.  (info should be in the reservation email). 
  • Instead of a traditional room key, the plastic wristband you get at check in is somehow electronically coded to give you access to your room.  (It's pretty cool, you just pass it in front of your door and it unlocks.)  You can also set up your wristband to allow purchases to be charged to your room.  It was really nice not to have to worry about keeping track of your wallet or room key while in the water.
  • Plan for some of your meals to be outside the lodge.  There are several eateries inside but you'll pay amusement park premium prices for your meals.  We grabbed lunch before we checked in at one of the restaurants close to the lodge and ate dinner at another restaurant on our 2nd day when we left.
  • Pack some snacks for your room.  I packed breakfast foods and some snacks so I could keep costs down.  You're not supposed to bring outside food into the waterpark area (there is a snack bar), but I did notice several families around us who brought in small snacks and drinks in their bags.
  • Try to have someone get down to the waterpark right when it opens to claim a table.  My son and I were at the doors right at 9am and were able to stake out a good table to serve as our "homebase" for the day.  By 10am, nearly all the tables had been staked out.
  • The lodge does provide free towels for use in the waterpark area.  They were perfect for the kids, but a little small for an adult. You might one to bring a beach towel of your own if you want to be able to wrap it all the way around you.
  • I thought there was plenty to do in the waterpark area for kids of all ages.  Because that was the main reason we went, we didn't do many of the other activities in the lodge.  However, I noticed lots of kids playing a Magic Quest game with a special wand (costs extra) and that could be a fun alternative to a whole day in the water, especially if you stay for more than one night.  There was also an arcade, spa, art room, storytimes and activities in the lobby, and more.  I can imagine it would get extremely pricy if you let your kids do all the extras, though.
  • I found the place to be clean and well maintained and the staff we dealt with were usually quite friendly and helpful.  (I often expect the worst after reading online reviews, but we had no problems.)  However, I will admit that the pizza we got at the lodge for dinner was pretty gross, especially considering it cost close to $20.
  • The lifeguards in the waterpark were very attentive and I felt comfortable letting my kids (ages 7, 9 and 10)  buddy up and go on some waterslides or attractions without me right by their side.
  • We stayed in the Loft Fireplace Suite and it was HUGE!  It had two double beds, a separate seating area with a pull out couch, a small balcony, a fireplace and stairs leading up to a loft with another double bed and a half bath. 
  • Since we were planning on staying at the park after checkout at 11, I took most of our belongings out to the car.  I rented a locker in the waterpark for $10 to hold our change of clothes, my purse and camera so I'd have quick access to them until we left the resort around 5pm.

I hope you've found this post helpful if you're planning your own trip to a Great Wolf Lodge.

February 15, 2013

Hidden Heart Cake

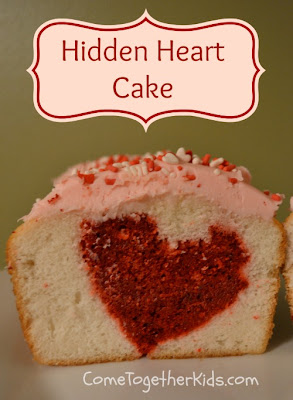
As soon as I saw this recipe for a Peekaboo Pumpkin Pound Cake on Pinterest, I knew I wanted to give it a try.  I figured Valentine's Day would be the perfect time to try my own version with a hidden heart instead of a pumpkin.  For awhile there, I thought I'd have a big Pinterest Fail on my hands, but it ended up working out okay and the end result was cute enough to impress my kids for a special Valentine's dessert last night.  (Of course, anytime they get cake for dessert they are excited, but I thought this treat was particularly cool.)

I'll include a few tips to help you avoid a potential fail in this "do as I say, not as I did" post.

Check out this cute cake...

cake with heart baked inside, valentine dessert

Isn't that cute?  Red velvet cake hearts that are revealed when you slice into a white cake.

Here's what you need:  (NOTE: I'm not a "from scratch" baker, so I used all box mixes and premade frostings, feel free to make your own if you'd like)


* box of white cake mix
* box of red velvet cake mix
* eggs, water, oil, etc. to make cakes
* loaf pan
* heart cookie cutters
* frosting (not pictured)


Here's what to do:

1.  Check the size of your heart cookie cutter and make sure it's small enough to fit into your pan.  (This was my first potential problem when I realized my cutter was too big and I had to run to Target to get a set with a smaller heart.)


2.  Bake your red velvet cakes in the loaf pan.  I made two of them because I had plenty of batter.  Allow your cakes to cool.  


NOTE:  After re-reading the initial recipe (after I was done), I realized they recommended refrigerating the cakes for a little while.  I think this will help the cake hold it's shape better when cut.

3.  Cut your cake into slices and then use the cookie cutter to cut out the heart shape.  


NOTE:  I think thicker slices held their shape better than the thinner ones I did in this photo.  Make your slices about the same thickness as the cookie cutter.

4.  Put a little bit of your white cake batter in the loaf pan, then arrange the heart slices down the center.  Pour the remaining batter along the sides and top of the row of hearts.


NOTE:  Here's where things got a little tricky and I thought the whole thing would be a fail.  Because I was trying to balance the hearts on their points (versus the wider base of the pumpkin in the inspiration recipe), they tended to tip over and the thinner slices started to split down the center.  Then, I had enough white cake batter to cover the hearts in one loaf pan but not the second.   Therefore, I'd definitely recommend making thicker slices of the red velvet and refrigerating them to firm them up.  I'd also either use two boxes of white cake mix or make only one hidden heart cake and use the extra batter to make a smaller cake.


However, I forged ahead and baked the lumpy, half-covered cakes and hoped for the best.


As you can see, they're lumpy because I didn't have quite enough white cake batter for two, but it was nothing a little frosting couldn't cover.


Make your slices with a sharp knife and check out the fun little heart in the middle...

valentines cake, cake with a heart inside


With the changes I made above in the notes, I'd definitely do this again.  You could do all sorts of different variations with shapes and colors using different cookie cutters and/or food coloring.

Sharing our cute cake at:

February 14, 2013

Photo Valentine's Cards

We made similar Valentine's cards last year and they were a big hit with the kids.  This year, when I asked my three what they wanted to do for their classmates, they requested these same lollipop cards.  They're so cute and they're fairly quick and easy to make so I happily obliged.

Check them out...

valentine card ideas

And they're really quite simple to make.  I simply took a quick photo of each kid in front of a blank wall with their arm outstretched as if they were holding onto something.


Then I used PicMonkey.com  to crop the photo, add text and a frame.  If you've never tried PicMonkey, check it out.  It's really easy to use and all the features I used for these cards are free.  (Other features, additional fonts, etc. require a small membership fee)


Then I just inserted the image into a Word Document, put four on a page, and printed them out on cardstock.  I used an exacto knife to cut a small slit at the top and bottom of the kids' hands on the picture and inserted a lollipop stick.  Finally, I put a little piece of tape on the back of the card to hold the lollipop stick in place so it wouldn't slip out en route to school.

homemade valentine card ideas

That's it!  Cute and easy enough to do last minute.

February 4, 2013

Colored Salt Hearts

Things have been very busy here at my house, so I haven't been posting nearly as much as I'd like.  That's why I'm thrilled to have a really neat guest poster here today to share a fun little craft that's just perfect for Valentine's Day.

I'm Tricia from Two Big Two Little, where I share crafts and activities that I do with my children. My kids range in age from 1 to 15, so we usually have a variety of end results to everything.   I'm very excited to be guest posting here at Come Together Kids today.Coloured Salt Hearts
Quite a while ago I saw a pin on Pinterest for Coloured Salt Glitter. I thought it would be great to be able to make my own glitter. We love glitter around here, but I get frustrated when I end up cleaning more of it up than what gets used. I finally got around to trying it out. While it certainly didn't make glitter, it does make very pretty coloured salt. To make the coloured salt, put some salt in a ziploc bag, put in a few drops of food colouring or liquid water colours and mix well. Spread the salt evenly on a cookie sheet. I put it on some waxed paper to keep the colours separate.Then bake in the oven for about ten minutes at 350 degrees. You can also let it air dry. I think that as long as you used food colouring to colour the salt, the salt would still be edible. Wouldn't that make some neat looking food?

 Coloured Salt Hearts


 I had bought a few salt shakers from the dollar store to hold the coloured salt. As I wasn't sure how this would turn out, I didn't make much of each colour.


Coloured Salt Hearts

I set these out for Sammie along with some glue and foam hearts.  I showed her how the salt would stick to the glue and make pretty pictures. She immediately tried it out for herself. She asked for a popsicle stick to help spread the glue all over the heart.
Coloured Salt Hearts

She started shaking salt like crazy all over her heart, using a bit of all of the colours.
I highly recommend doing this craft on a tray of some sort, so that any extra salt can be collected and reused or thrown out when your kids are done.
Coloured Salt Hearts

When the first one was all covered with salt, she started another one. For this one, she drew with the glue and then covered it with the salt.


Coloured Salt Hearts Coloured Salt Hearts

She ended up making quite a few of these and Maddie ended up joining in to make a couple of them. Coloured Salt Hearts

 We have found that these do not keep very well, as the salt will start to come off as the glue dries. It will also rub off if touched. So you might to warn your child before hand that this will not be a keeper craft. Be sure to take lots of pictures if they would like to be able to keep them. The girls really liked using the coloured salt to make this colourful hearts. I need to make more coloured salt now lol. I can also think of lots more ideas to use the coloured salt for. Watch for more posts to come on Two Big Two Little that will use the coloured salt :)


Tricia is a stay at home mom to 4 great kids, two big kids aged 15 & 13 and two little kids aged 4 and 1. She shares craft, activities and some DIY posts that she does mainly with her girls, one big and one little, although every once in a while the big and little boys join in on the fun :) Her blog is Two Big Two Little and you can also find her at her Facebook page, and Pinterest boards. She is also a newcomer to Twitter

Thanks so much for sharing, Tricia!  I'd seen the same idea on Pinterest and wasn't sure how it would turn out.  Thank you for giving it a test run and showing the fun your little ones had with the project. 
Related Posts Plugin for WordPress, Blogger...