December 31, 2012

New Year's Eve Time Capsule (with printables)

NOTE:  Updated version for 2014 is at the end of the post!

I know it's last minute, but this is such a cute little project and a simple way to capture some memories from 2012.  Today the kids are each making a little time capsule out of an empty 2 liter bottle.  We've added a few things to them already, and we'll add a few photos, drawings and knick knacks to them tonight before we seal them up.  

Check it out...


All you need is an empty 2-liter bottle that's been rinsed out and dried.  Peel off the label and carefully cut out a flap in the plastic where the label was.


Next, make a new label for your time capsule and fill out some important things you want to remember about 2012.  (Printables for the ones we used are at the end of this post!)


Add any extra things you want to put in.  We measured and cut out the kids' heights using some ribbon, then put the piece of ribbon in the capsule.  We also traced hands on a foam sheet and cut those out.  When we open up our time capsules, it'll be easy to see how much they've grown by holding up the ribbon and comparing handprints.


When you've included everything you want, just tape or glue closed the flap you cut in the bottle.  Put the time capsule label over the sealed flap and hide your bottle away till you decide to reopen it.  (I'm going to put ours in the attic with the Christmas decorations.  We'll open them next year on New Years Eve to look back and compare what's changed in a year).


These could also be fun to do on your child's birthday each year!

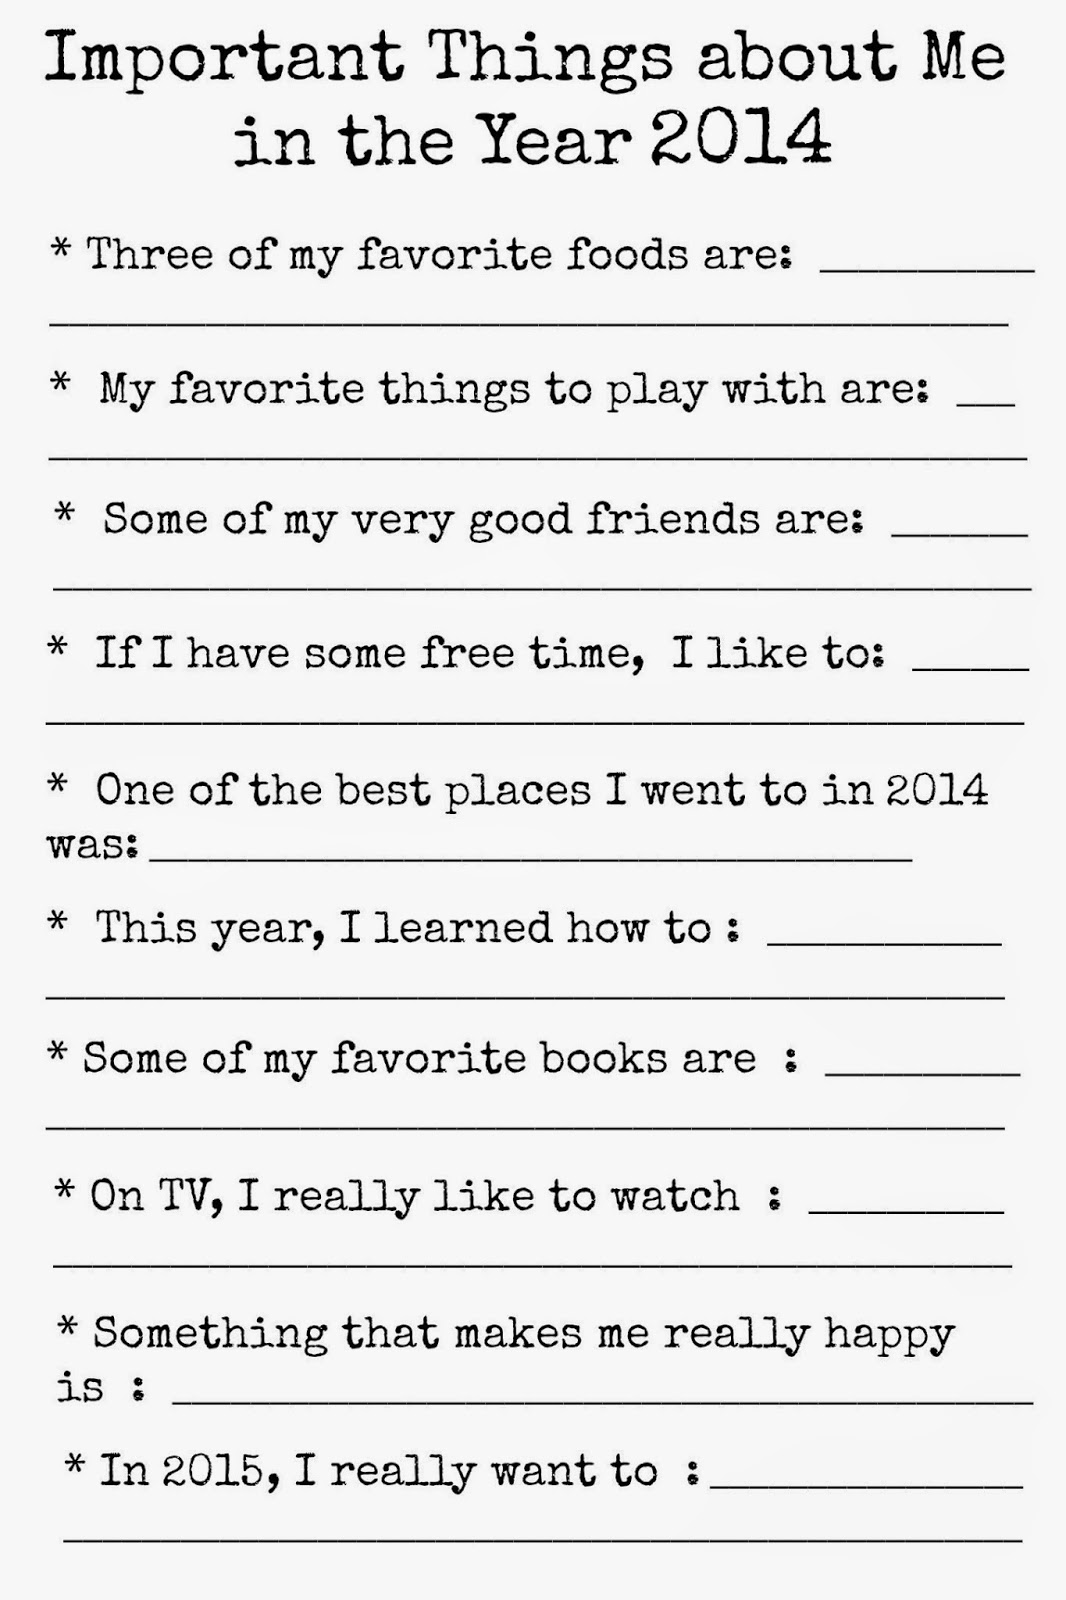
Here are the printables of the label and questionaires we used. (Just click on the images below for the PDF file)  NOTE:  There are two separate files ~ one for the label that you could use any time and one for the 2012 questionnaire.


Here is an updated version for 2013...

https://drive.google.com/file/d/0B3zrTidgHMVWZW54UEJ1M3ZaM1E/edit?usp=sharing

And Here is an updated version for 2014...

https://drive.google.com/file/d/0B3zrTidgHMVWS3Zkd2REcFNaN0k/view?usp=sharing

December 29, 2012

Saltine Toffee

I love making recipes that are easy and delicious, but have a cool little twist.  I first found this Saltine Toffee recipe years ago in one of those community cookbooks where everyone submits their favorite recipes.  I love making it because it's so super simple, but tastes absolutely awesome.  (I've heard of it referred to as "Christmas Crack" and I can see why, it's really addicting!)  You wouldn't think saltine crackers would belong in a candy recipe, but the slight saltiness and crunch that they give this toffee is just perfect.

Take a peek...

toffee made with saltine crackers, Christmas Crack

Here's what you need:  (It's only 5 ingredients!)

  • saltine crackers (about 1 sleeve of crackers out of a box, plus a few extras)
  • 1 cup of butter (that's 2 sticks)
  • 1 cup of brown sugar, lightly packed
  • 2 cups of chocolate chips, either milk chocolate or semi sweet (that's about 1 bag)
  • approx 3/4 cup chopped nuts (optional)
Here's what to do:

1.  Preheat your oven to 400*.

2.  Line a jelly roll pan (which is a cookie sheet with sides), with aluminum foil and spray lightly with cooking spray.

3.  Line up your saltine crackers in a single layer in your pan.  You'll want them close together, but not touching.  You can break some crackers in half if you need to so the whole pan is covered.

Christmas Crack, toffee with saltine crackers

4.  Put your butter and brown sugar in a saucepan over medium heat.  Bring to a boil, then allow the mixture to boil for 3 minutes, stirring only once or twice.

5.  Pour the mixture over the saltine layer.  Try to pour it fairly evenly over the top, reaching all the way to the edges.  However, it will bubble up and spread out in the next step, so every cracker doesn't need to be completely covered.

6.  Next, put the tray in your preheated oven and bake for about 5 minutes.  The toffee mixture will bubble up and soak into the saltines.

7.  Take your tray out of the oven and sprinkle on the chocolate chips.  Pop it back into the oven for just a minute so the chips soften and melt.  Then use a rubber spatula to spread the melted chocolate evenly over the saltine/toffee layer.

8.  If desired, sprinkle the optional chopped nuts over the melted chocolate layer.  Set the whole pan aside for it to cool completely.  It'll take a few hours for it to cool and for everything to harden.  If necessary, you could put it in the fridge to speed up the process.

9.  When everything has cooled, break the toffee apart into bite sized pieces and enjoy!

Handprint Snowmen Candles

We've decorated plain candles using the tissue paper technique a few times now and the results have always been cute.  First we made some Artwork Candles ~ we drew our own pictures with markers on tissue paper, then put them on a plain white candle.  Then, for Mother's Day, we used paint to make some cute thumbprint designs which we also put on candles for the grandmothers.  For both of those projects, we used white tissue paper which "disappeared" into the candle as it was fused on.  This time, we used darker blue tissue paper to make some cute, winter snowman candles.

Check them out...

gift ideas, candles,

Cute, aren't they?  I like how we were able to make the handprint snowmen I'd seen done on ornaments, but we did them on candles which can be displayed long after the Christmas trees are taken down.  The dark blue tissue paper also fused into the candle, but the brighter blue color really stands out and shows off the kids' white handprints.

Here's what you'll need: 
(sorry, I somehow deleted my "before" picture of the supplies)

  • white pillar candles (mine are about 5" high and came in a 2-pack at Target)
  • blue tissue paper (like you would use to package a gift)
  • paints (white for the handprints, and a few colors to add the details)
  • waxed paper
  • heat gun or hair dryer (Hair dryers work, but the heat guns have more concentrated heat and work a lot faster.  My heat embossing gun is similar to this one  ~ you can find them at most craft stores in the paper crafting or rubber stamping sections)  
 Here's what to do:

1.  Cut a piece of the blue tissue paper that is as tall as your candle and wide enough to wrap all the way around it.

2.  Using the white paint, have your child dip their palm and fingers in the paint, then press it onto the tissue paper.  (Since the tissue paper is so delicate, practice a few times so you'll get the hang of how much paint to use and how to press down and lift the hand back up without tearing the paper too muchA little rip is fine, but big ones might be noticeable )  Once you have the handprints down, use the other colors of paint and a fine-tipped brush to add the details to your snowmen ~ little scarves, eyes, noses, buttons, etc.


NOTE:  My kids all have the normal 4 fingers and a thumb, but we opted to not use their pinkies and thumbs on our candles so I could fit all three kids on one candle. 

3.  Once your design is complete and the paint has dried, wrap the tissue paper around the candle.  Then wrap a piece of waxed paper on top of the tissue paper to hold it in place.  Using the excess waxed paper as a handle, direct the heat from the heat gun or hair dryer towards the candle.  As the candle wax warms up with the heat, you'll see the tissue paper "melt" into the candle.


See how the candle on the right has both darker blue and a lighter blue?  The darker blue section is where the heat has melted the wax.

4.  Continue directing the heat all the way around the candle until all the tissue paper has been fused onto the candle.  Then peel off the waxed paper and you're done.

candle making, snowmen, gift ideas

Note:  We mainly use these candles for decorative purposes.  We've burned other candles using this technique and haven't had any problems.  However, it's impossible to guarantee that the tissue paper might not flare up in spots if you burn it all the way down.  Use caution if you do decide to light your candles and let them burn to the edges.

Make sure you check out our other versions of these candles too ~ here are the Artwork Candles and the Mother's Day Fingerprint Candles

December 19, 2012

Melted Snowman Bottled Water Labels (with free printable)

Need a quick and easy idea for drinks for your kids' classroom party?  Maybe you're having a party at your house this winter and want something cute and simple?  Do you wait till the last minute, but still want something fun?  

Check out how I added a little extra cheer to some regular bottled water...

winter party ideas


So cute and super quick and easy.  I made up little labels that I could cut out and stick on the water bottles using regular clear packing tape.  I opted for this method over printing directly on regular sticky labels for a couple reasons.  One, I can never figure out how to get my images the right size to align properly on the labels.  They're always too big, too small or running off one side.  The other, more practical reason, is by using packing tape over the label, I avoid the chance of the ink running and the image being ruined by a drip of water.  I wouldn't put these bottles in a cooler full of ice, but the image should be fine if just a little water spills on it.

All you have to do is pick up a case of water, print out three sheets of the labels on regular printer paper (there's 8 on each sheet), cut them out, and stick them on!  Quick, cheap, easy and you probably have everything you need at home.

winter party ideas


Here's a printable of the labels.  (I think I have it set up correctly so if you just click on the image below, you'll have the printable PDF, but let me know if you run into any problems.)


Sharing at:

December 17, 2012

Holiday Chore Naughty List

I think there are two types of vacuumers.  On the one hand, you have those who have a vacuuming routine and vacuum on a daily or weekly basis as part of their housekeeping schedule.  On the other hand, you have those who pull out the vacuum only on an as-needed basis.  I am definitely in the latter category.  I'll bring out my vacuum when I can actually see the crumbs, fuzz and little bits of this and that accumulating on my carpets or when I'm expecting company and everything gets cleaned up for guests.  Most of the year, my system suits me just fine.

 Come December, though, just like Santa I'm hard at work on my own naughty list.  On  that list goes all those things that might bring joy to our faces but dirt to my floors!


Now, don't get me wrong, I love the smell and look of our real Christmas tree, making and eating yummy treats, and working on holiday crafts with the kids.   However, all those things on the naughty list means I'm pulling out the vacuum cleaner more now than any other time of year.

Even with some fun Christmas music playing in the background, it still gets frustrating if you have to constantly lug out an old, heavy vacuum cleaner and then go back and forth over the same section of carpet just to pick up those little needles, scraps and crumbs.  Luckily this year, I've been using a new Panasonic Jetforce Vacuum ( I have model MC-UL427) and it's making the chore a whole lot easier.

A few features that I love...

  •  The suction is awesome.  Every time I use it, I keep saying to myself "Wow, it's sucky! It's very sucky!"  (Can you tell we've watched the movie "Elf" a ton of times already this year?)
  • It's really lightweight ~ less than 15 pounds and easy to move from room to room or up and down stairs.
  • It's bagless and the filter has an hourglass shape so all the dirt and dust don't clog the filter and make it lose suction.
  • It has a turbine brush attachment that makes it really easy to tackle pet hair or crumbs from carpets and furniture.
  • It has a stretch hose, wand, dusting brush and crevice tool so I can reach those pesky pine needles wherever they get tracked.
  • It has an easy to reach switch to turn off the agitator brush when you're on bare floors or using the tools.
  • And my favorite feature, the 24-foot cord retracts in an instant with a push of a button. 

         
My only problem with the Panasonic Jetforce Vacuum is this...


Nope, it's not the dust bin itself.  I actually find it really easy to empty and clean out.  The whole contraption lifts right off the vacuum so you can carry it over to the trashcan.  Then you just release a little clip on the bottom of it and the dirt falls right out.  Nope, my problem is that it picks up so much more than my old vacuum did.  It's a little gross seeing just how much I was missing before.  The good thing about it is that I know my carpets and floors are cleaner than they've ever been before!

How about you?  Are you a regular vacuumer or an as-needed one like me?  Would you add anything to my "naughty list" of holiday culprits?

I participated in a campaign on behalf of Mom Central Consulting for Panasonic. I received a product to facilitate my review.  However, all the opinions stated are 100% mine and I truly did love this vacuum.

December 10, 2012

Elf on the Shelf Ideas ~ Week One (2012)

The kids have been really excited to see the antics of our Elf on the Shelf this year.   Our Elf isn't super fancy in his adventures, but the kids have fun with it nonetheless.  For TONS of awesome ideas to inspire your Elf, make sure you check out our Elf on the Shelf Party.  There are literally hundreds of different ideas you can use for inspiration ~ some are simple, some more elaborate, some sneaky, and some sweet!

Here's what our Elf has been up to this week...

Day 1 ~ He brought all the fixings for a yummy breakfast!  (more details HERE)


Day 2 ~ He left a message on the bathroom mirror, written in lipstick!  (Since I rarely wear lipstick, the kids asked where he got it.  I proposed that he might have borrowed it from Mrs. Claus and they got a kick out of that idea!)


 Day 3 ~ Our Elf was practicing his fine motor skills by stringing Fruit Loops on a pipe cleaner.  Notice how our smart little Elf picked out all the red and green ones and made them into a pattern !


Day 4 ~ The kids spotted our Elf sitting in the pantry sipping syrup through a straw!


Day 5 ~ He really practiced his camoflaging skills when he hid on the shelf in my son's room, blending in with a red foam finger!


Day 6 ~ We had just picked out our Christmas tree the night before.  It was set up in its stand, but had no decorations yet.  We found him perched on the curtain rod with the perfect vantage point to watch the tree trimming festivities.


Day 7 ~ Oops, he's still in the same spot.  My son theorized that he was so busy looking at all the ornaments and lights that he forgot to move.  I told him that was a very likely explanation.  (Not that Mommy was exhausted after a day at an amusement park with the kids and a night of tree trimming and fell asleep ;)  )


What has your Elf been up to?  Has he or she remembered to move every night?  Have there been any funny tricks or cute scenarios set up?   Tell me about your Elf in the comments or share your posts HERE if you've blogged about it.

December 9, 2012

Faux Gingerbread Houses

With three kids, I've had many attempts at Gingerbread Houses over the years.  They love the idea of making a house out of cookies and candy, but every year we end up being disappointed by the final results.  We can never get the royal icing to actually hold the walls and roof together so the whole house ends up being lopsided, if we were even lucky enough to get it to stand up at all.  Then, that same darn royal icing ends up dripping and glopping all over the place when we try to attach the candy pieces.  If they don't get too frustrated, they do enjoy the process, but I knew I wanted to come up with a better idea for this year.

Check out our houses...


Don't they look cute?  They look like real gingerbread houses and they even SMELL like real gingerbread houses.  We got to plan our designs and choose fun candies to put on them.  They even have what looks like royal icing on them as decoration  ~ but we didn't have to deal with the real thing.  Best part, the girls and I had an awesome time making them.  (My son opted to let me make his while he watched his usual Sunday afternoon of football!)

Now, do you want to see what made this project so easy?  Check out what we used as our house forms...


That's right!  Our cute gingerbread houses started out as some unfinished birdhouses from the craft store.  

I realized that every year,  we enjoyed the process ~ designing, working with candy, snacking on some of the candies and seeing our finished houses ~ but we really never ended up actually EATING our finished, lopsided, drippy houses.  I figured, why not make an inedible house and save ourselves some of the hassle.  To add a little extra bit of fun, we scented our paint with some cinnamon so our houses actually have a slight gingerbread smell (and it really smelled awesome while we were painting them.)  For the royal icing look, we made some microwave puffy paint and to attach the candies we just used hot glue.

Here's what you'll need:

  • unfinished wooden birdhouses (less than $5 a piece if you use a coupon at the craft store)
  • brown acrylic paint 
  • cinnamon
  • paint brushes
  • 1 cup of flour
  • 4 tsp. baking powder (not baking soda!)
  • 4 tsp. salt
  • water 
  • squirt bottles (we used the Wilton ones, but any squirt bottles should work)
  • assorted candies (we used lots of non-chocolate candies ~ chewy Sweet tarts, gumballs, candy canes, peppermints, Mike & Ikes, etc)
  • hot glue gun
Here's what to do...

The first step is to paint your houses.  We poured some brown paint into a small container and then added cinnamon for the fun scent.  Mix it together, adding some water as necessary to get the right consistency.  You'll want it a bit thicker than regular paint, but still spreadable.  Once you have your scented paint mixed up, paint away.


The houses looked nice and realistic and it smelled AWESOME while we were painting!

For the next step, you'll want to mix up some microwave puffy paint.  We've done this several times, but I've never posted about it.  It's really simple though.

In a bowl, mix together 1 cup of flour, 4 tsp of baking powder, and 4 tsp of salt (you can half or double the recipe if you need more or less ~ this was plenty for 3 gingerbread houses).  Next, gradually add water and stir until you have a mixture with a consistency of a thick pancake batter.  You want it squeezable but not too runny.  Put the batter in a squeeze bottle and start adding the icing details.  Now here's the cool part, after you add a few details (we did one side/section at a time), pop the house in the microwave for about 45 seconds.  The "paint" will puff up and dry instantly.  Now, you'll have a hardened icing look in just seconds. 
 (NOTE:  when we used the puffy paint on paper, we just microwaved it for about 30 seconds, on the houses, it seemed to take a bit longer about 45-60 seconds.  You'll want to start at about 30 seconds, see if your paint is setting up, then add time as needed.)


Once you have all your icing details in place, it's time to add the candies!  I allowed my 10-year old to handle her own hot gluing, but I did the gluing for my 7 year old (she gave me very precise directions on which candies went where!).


That's it!  We really had a fun time and the girls were so proud of their finished houses.  They still have a slight gingerbread smell and they look really cute.  I'm sure you could eliminate the cinnamon scent, but I figured since we had to paint them anyway, it was a fun little addition.  You could also try another type of  3-dimensional white paint for the icing details, but we loved the quick drying aspect of the puffy paint (and it really does look like icing!)

Oh, and we still got the fun of eating some of the extra candies too!


Here's one last look at a finished house...

gingerbread house ideas

December 6, 2012

Easy Puzzle Saver Technique

Last month, when the kids were off school for Election Day, we worked on a 1,000 piece puzzle of the U.S. Presidents.  We enjoyed doing it and with all four of us working together, we actually completed it in just one day.  However, once it was done, it sat on the floor in the corner of my living room for nearly a month.  The kids wanted to save it and hang it up, but I didn't want to deal with the hassle of using the puzzle saver glue.  I'd tried the glue before  ~ it was kind of messy and I didn't think it held the pieces together all that well.  I knew there had to be a better solution, but it took me a month of stepping around the finished puzzle before it finally came to me ...  Use iron-on adhesive!

It turned out awesome and it was super quick and easy to do.  Seriously, like 5 minutes tops!  All you need is some Heat n Bond Iron on Adhesive.  It's meant to be used on fabric (I use it all the time) so you can find it in most fabric stores like JoAnn's or even in the fabric aisle at Walmart.  

Check out how it works on puzzles...

puzzle saving techniques, puzzle saver


Here's all you have to do...


1.  Put your completed puzzle on a piece of poster board.  This puzzle was a large one, so I had taped two pieces of poster board together as we were doing it to give us a work surface.  

2.  Put another piece of poster board (here I used two to cover our big puzzle) over your completed puzzle to make a puzzle sandwich ~ poster board, puzzle, poster board.
 
3.   With your puzzle sandwiched in the middle, carefully flip over your pieces.  Remove the top piece of posterboard and you'll now have the back of the puzzle facing up.


Now get out your iron and Heat n Bond...


4. Cut a piece of the adhesive paper about 1/2" larger than the size of your puzzle.  

5.  With the paper side up, use the medium heat (no steam) setting on your iron the paper onto the back of your puzzle.  Go over it a few times to make sure it sticks to the back of each puzzle piece.

6.  If your puzzle is large like mine was, repeat with another piece of the adhesive paper so the entire back of the puzzle is covered.  (It's okay if it overlaps in places.)  Go over the whole puzzle, making sure the paper is sticking all the way to the edges and to each piece. 

7.  Once it's adhered, you'll be able to easily lift your whole puzzle up.  Flip it over and trim off the excess adhesive paper.  I found that an exacto knife gave a much better and closer trim than scissors.


I originally thought I'd have to mount the puzzle onto a piece of foam board or something after I ironed on the adhesive, but it worked really well without it and I didn't think it was necessary.  As you can see in the picture above, I'm holding the whole puzzle just by one corner.  It was as stiff as a sturdy piece of cardboard and didn't flop around at all (unlike another puzzle we'd done before using the puzzle glue).  All of the pieces were securely attached, but there was no brush strokes from any kind of glue to distort the image.

I just used two small nails to hang our puzzle on our playroom wall.  ( I drove the nail through a spot in the corner where the puzzle pieces joined )


I think it looks awesome.  It was super quick, not messy at all and it made our puzzle nice and sturdy.  The adhesive comes in a large roll for just $10 or so.  It's enough to do several puzzles (or puzzles and other fabric projects) ~ so it's way cheaper than buying frames to display your hard work.

Sharing our puzzle saving idea at:

Elf on the Shelf Breakfast 2012

Last year, our Elf on the Shelf left the ingredients for a special breakfast (see last year's breakfast here).  It was a huge hit with the kids so he did the same thing this year.  Of course, once morning arrived he couldn't actually move to make the breakfast, but he'd set the table for us and left all the ingredients.  All I had to was prepare a simple, but fun, breakfast. 

elf on the shelf ideas, elf on the shelf breakfast

Check out our special meal...


He left me a box mix for the chocolate peppermint pancakes, so that was simple to mix and make.  A little dollop of whipped cream and some red and green sprinkles made them extra special.  Our Elf also left some fun straws to drink our hot chocolate.  The night before, he made some North Pole Grapes and they were ready and waiting for us in the freezer.  

Check them out...


frozen grapes, Christmas food ideas for kids

They were super simple to make.  Our Elf just rinsed the grapes.  While they were still wet from the rinsing, he rolled them in red decorating sugar and stuck them in the freezer.  By the next morning, they were frozen and really yummy!

As I said, it only took a few minutes to put together, not really any longer than breakfast on a regular morning.  However, the addition of the special paper plates, napkins, straws and a little bit of sprinkles really made an impression on the kids!

 Want more ideas to inspire your Elf?  There are dozens of awesome ideas HERE!

Sharing our breakfast at:

December 5, 2012

Think they're telling me something?

It's December.  How in the world did that happen so quickly?  Somehow, while I've been super busy substitute teaching, soccer and basketball practice shuttling, school project assisting, sibling fight refereeing and just general busy mom-ming, the days, weeks and months have been flying by.

 New posts will be coming.  Our Elf on the Shelf returned this week.  I figured out a cool (and super simple ) way to preserve puzzles, discovered  a yummy make-your-own hot chocolate mix, and I have some gift ideas that might be helpful if you're looking for some non-electronic ideas for your elementary schooler.  There are probably even more posts that I've taken pictures for or have in drafts that just got pushed to the side for now (gosh, working out of the home almost full time takes a lot of you).

Anyway, I didn't have to worry that I hadn't taken any of the Christmas decorations down out of the attic yet.  The girls decided to decorate the mantle on their own the other day.  While I do have a nice garland, the stockings and some other decorations that I can put up, their homemade snowflakes hung up with scotch tape and yarn will hold us over for another few days.


Oh, and they even made a sign reminding us that it's the North Pole...

 
Please tell me I'm not the only one who's been swept up in the busy-ness of life.  Are you all equally crazy and busy too?  How do you juggle everything ~ whether you're busy working at home or out of the home?
Related Posts Plugin for WordPress, Blogger...