Showing posts with label Fall. Show all posts

September 28, 2012

Chocolate Peanut Butter Candy Corn Bugles

How's that for a title?  I'd seen the idea for chocolate peanut butter Bugles and thought they'd be perfect in candy corn colors.  Now, before we go any further, I've eaten enough candy corn over the years to know that these aren't the "official" candy corn colors in the proper order.  I know that it should be yellow on the bottom, then orange, and white on the tips.  However, I wanted to keep some of the yellow of the Bugles snacks showing so I had to use the orange at the base to keep the peanut butter in.   Believe me, though, once you taste these yummy little treats, you won't care that the color order has been switched around!

Check these snacks out...


Here's what you'll need...

  • Bugles snacks
  • Peanut butter
  • Orange and White Melting chocolates
Here's what to do...

1.  Start by filling each Bugle with a little bit of peanut butter.  I didn't do anything fancy, just used a knife to spread a little bit into each one.  (You'll find that the openings on some of the Bugles are too narrow to get much peanut butter in.  You can just snack on those "defective" ones as you're working! :)  )


2.  Next, melt your orange melting chocolates and dip the peanut butter end of the Bugles in the chocolate.  Put on waxed paper to cool.


3.  Do the same with your white melting chocolates and dip the pointed end in the white.


4.  Allow your treats to cool and harden and they're ready to go!


Let me tell you, these were a huge hit with the kids (even their dad loved them).  The combination of the chocolate & peanut butter with the salty crunchiness of the Bugles was delicious.  It reminded us a bit of a candy bar, a Kit Kat maybe, but with a little more saltiness and crunch.

Sharing at:
Tip Junkie

September 25, 2012

Snickers Caramel Apple Salad

I've been making this recipe for several years now and it's always a big hit  ( I think I originally wrote it down from one of those church cookbooks where everyone contributes recipes).  You get all the yumminess of caramel apples, but in a creamy "salad" form.  Plus it's a great way to use up all those apples you get while apple picking ~ we're about 20 pounds into the 50 pounds we picked a few weeks ago!

Check it out...


Here's what you need for the party-sized bowl I usually make (recipe can be halved) :

  • 6-7 medium sized apples
  • 20 fun-sized Snickers bars
  • 1 cup chopped peanuts
  • 16 oz Cool Whip (I use light.  It still tastes great and helps offset all those Snickers!)
  • 20 oz can crushed pineapple

Here's what to do...


1.  Core and dice your apples into about 1/2" -3/4" pieces.  I use both red and green apples and usually leave the skin on, but you can peel them if you like.  Cut up your Snickers bars into pieces about the same size as your apples.   Add the chopped nuts and set aside.

2.  Drain the crushed pineapple and squeeze out as much of the excess liquid as possible.  Mix together the Cool Whip and the pineapple.

3.  Gently fold in the apples, Snickers and nuts and gently stir until everything is combined.

4.  Refrigerate until ready to serve and enjoy!!

NOTE:  This dish is quick and easy to put together, so don't make it too far in advance.  The crushed pineapples add a great flavor to the salad, but they will separate and create a little extra liquid at the bottom of the bowl.  It's still yummy, but not as visually appealing as when it's fresh mixed. :)

Sharing the apple goodness at:

September 18, 2012

Apple Cobbler Dump Cake (with fresh apples)

As I mentioned on our Facebook page, the kids and I went apple picking yesterday at a local orchard and came home with 50 pounds of apples!  We'll eat some just fresh and make some into Homemade Applesauce, but we knew we wanted to make some tasty desserts with all those fresh apples.  Luckily, a friend had just pinned  this Fresh Apple Cake by A. Liz Adventures ~ what timing!  An easy recipe using fresh apples and I had all the ingredients on hand.

Doesn't this look yummy?

easy apple dessert

Now wait till you see how easy it is to make.  The kids did 90 percent it themselves (which is good because I was the one who had to carry the 50 pounds of apples through the orchard!)

Here's what you'll need...

* fresh apples (sliced about 1/4" thick ~ we kept the skin on and used about 7 apples)
* box of yellow cake mix
* 1 stick of butter


Here's what to do...

1.  Spray a 9x13" baking dish with cooking spray. (You could easily do it in a smaller dish too, just adjust the amount of each ingredient).

2.  Dump all the apples in the dish and spread them evenly over the bottom.


3.  Pour a layer of dry cake mix over the apples.  (We didn't quite use the whole bag, just enough to cover the apples with a decent layer)


4.  Melt a stick of butter and pour the melted butter evenly over the cake mix.


5.  If you're feeling like a real baker, go ahead and sprinkle a little apple pie spice or cinnamon over the top.  (Optional, but my oldest insisted it would make it even more delicious.)


6.  Bake at 350* for about 35-45 minutes until the top is slightly golden and the apples are hot and bubbly.  (Note: with about 10-15 minutes left in the cooking time, peek in at your cobbler.  If you notice there are some dry patches of cake mix, you can sprinkle just a little bit of water on them so it's not powdery.  Then continue baking)

7.  Take out of the oven, let sit for just a few minutes, then serve with a scoop of ice cream!  (I wanted to snap a picture of the kids enjoying their cobbler, but in the couple minutes it took me to photograph my serving for this post, they'd nearly finished theirs!  Take my word for it, though, they loved it!!)

Sharing the yumminess at:

September 17, 2012

The Story of the Apple Star

Years ago at a fall festival,  I remember a story teller telling a really cute story about the star that you see when you cut into an apple.  When the kids and I came home from apple picking at the orchard today, I thought it would be a fun time to share the little legend.  However, although I remember the basic premise, I couldn't remember any of the details.  Googling led me to several versions of  "The Little Red House with No Windows, No Doors, and a Star Inside" but I couldn't find the story I'd heard.  Finally, I came across this version on a site for Girl Scouts.  It was short, but was the closest to the one I'd heard a long time ago.  I decided to elaborate on it a little bit and make my own version.  It was a big hit with my kids and I like how it includes a little lesson on how hard work and patience can bring you rewards.

Check it out...

how did the star get in the apple story


Click HERE or on the story below for a printable PDF version!
https://drive.google.com/file/d/0B3zrTidgHMVWRDh0MFZ6X0RrX3c/edit?usp=sharing
And here's my son after I read the story and I cut into his apple to reveal the star...


Definitely check out the version that inspired me HERE (she also has a cute dried apple wreath project to go with it)


November 18, 2011

Five Fun Ideas for Turkey and Pilgrim Activities

With Thanksgiving right around the corner, 
I thought I'd share some fun ideas 
to make your "Turkey Day" extra special this year.  Check out these awesome Turkey and Pilgrim posts that were linked up to our Fall Fun Party.


1.  Eat or Be Eaten Turkey Toss
{ Dinosaurs and Octopuses }

You have to check out this adorable Turkey Toss game Joyce created!
I may not be able to make a turkey beanbag 
nearly as cute as this little fellow, 
but I definitely plan on letting the kids play a version 
of this game after dinner next Thursday.

( Kids always seem to still have energy even after a big meal, so they can have a fun beanbag toss while the grownups take a nap on the couch!)


2. Spin Art Turkeys
{ Dilly-Dali Art }

Wouldn't these turkeys be adorable place cards or centerpieces 
on your Thanksgiving table?
All you need are toilet paper tubes and paper plates!
 (And if you haven't tried doing spin art in an old salad spinner,
you have to let your kids give it a try.
They'll have a blast and you'll get some really fun designs.)


3. Bottle Cap Turkeys
{ Dilly-Dali Art }

Aleacia has another fun Turkey craft here.
My kids LOVE working with feathers, 
pipe cleaners and googly eyes.
If they just add some bottle caps, 
they can make these fun gobblers.


4. Chocolate Marshmallow Pilgrim Hats
 { Phaedra's Adventures }

I love serving fun little treats that look cute, 
but are simple to make.
Just dip marshmallows in chocolate, put it on a cookie 
and add a frosting buckle
to make some fantastic little Pilgrim's hats.
(In her post, Phaedra also shows how to make 
some turkey cupcakes and cookies that are a 
little more labor intensive, but super adorable!) 


5. Pilgrim Finger Puppets
 { Let Kids Create }

Save a few more toilet paper tubes 
and you can make these cute little Pilgrims
to go along with your Spin Art Turkeys.
The adults can sit back and relax while the kids 
put on a puppet show after dinner.
(Can you tell I like to relax after eating my turkey and pumpkin pie? ;)  ) 


Finally, here's one last bonus idea 
that I think is fantastic.

Thanksgiving Turkey Printable
{ Under the Big Moon }

Use this cute printable turkey and poem to spread 
Thanksgiving greetings throughout the neighborhood!


Thanks, ladies, for sharing your awesome ideas!
Our children give us a lot to be thankful for
and these cute activities and treats give us a fun way to 
come together this Thanksgiving!

Feel free to grab a featured button if you'd like


Come Together Kids

And don't forget to swing by our Fall Fun party! 
There are ton of other great ideas and it's ongoing, 
so more ideas are linked up all the time! 

Come Together Kids

November 6, 2011

Buffalo Chicken Dip

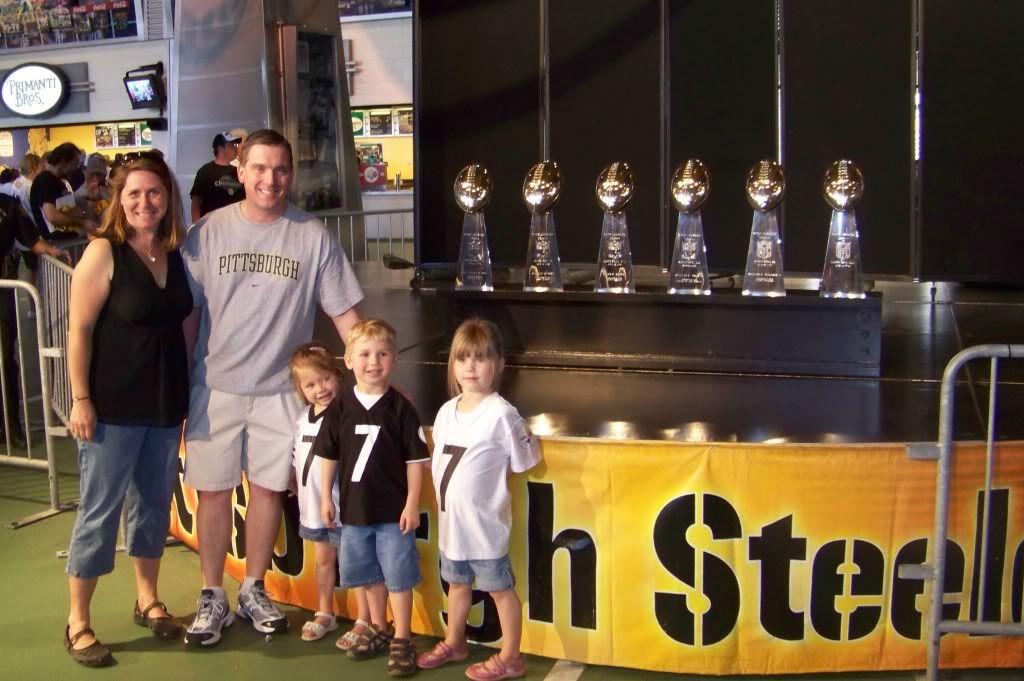
A big part of our Sunday afternoons in the Fall is spent watching NFL football.  We're proud members of the Steeler Nation (but we live smack dab in the middle of Ravens Country, literally just minutes from their practice facilities).  Quite often, when there's a good 4 o'clock game on, we replace our regular family dinner at the table for a bunch of appetizers in front of the TV.  ( I figure sometimes the bonding we do in support of our favorite team is just as valuable as the bonding we do at the dinner table.)


Anyway, here is one of my favorite appetizers to make.  While I personally don't like actual buffalo wings (there's something I don't like about meat on the bone), I LOVE anything with buffalo wing flavor.  This dip is easy to make and really yummy.

I adapted the recipe slightly from THIS one I found on allrecipes.com.

Here's what you need:
  • approx. 1+ lbs of cooked chicken, shredded or cubed ( I usually cook 3 fairly large boneless breasts in the crockpot, then cut them up)
  • 2 (8oz) packages of cream cheese, softened (reduced fat works fine, but not fat free)
  • 1 cup ranch dressing (or blue cheese)
  • 3/4 cup hot sauce  (you can adjust up or down according to the amount of heat you like)
  • 1 1/2 - 2 cups shredded cheddar cheese
  • celery sticks, chips or crackers for serving

Here's what you do:

1.  Heat the cooked chicken and hot sauce in a large skillet over medium heat until heated through.  I think this step is the key to a yummy dip since the chicken pieces absorb a lot of the hot sauce flavor!


2.  Add the two softened bricks of cream cheese and the cup of ranch dressing.  Then stir until combined.


3.  Add half of the shredded cheddar cheese and stir again until combined.


4.  At this point, I usually transfer the dip to my crockpot and top with the remaining shredded cheese.  I'll keep it on low or warm and just scoop out some as I want it.  I like how the crockpot will keep it nice and warm and ready to eat throughout the game.  However, you could also just transfer it to a baking dish, top with the extra cheese, pop it in the oven to melt and then serve it immediately.


Hope you enjoy!  


And for any other Steelers' fans out there, 
let's hope this year we can get our 7th Lombardi Trophy!

The Come Together Kids' crew at Heinz Field!

Sharing our dippiness at:

November 3, 2011

Homemade Applesauce

Homemade applesauce is so easy to make, 
so delicious and makes your house 
smell so awesome, you won't want to buy 
the jarred applesauce from the stores again.


I really don't use a recipe or measure out any exact ingredients, but I follow the same basic steps each time and it always turns out great.

Here's what you need:
  • apples ( We like to use a variety of apples in each batch, just nothing too tart)
  • water
  • cinnamon (optional)
  • sugar (also optional, we usually don't add much at all if our apples are sweet)
Here's what you do:

1.  Peel and core your apples.  (I usually do this step ~ peeling, cutting the apples in four large chunks, removing the core, then let the kids help with the following steps)


2.   Cut your apples into smaller pieces.  They don't have to be exactly the same size, but try to get them around 1" or smaller.  ( The kids can usually cut the apples just fine themselves using a butter knife )


3.  Put your apple pieces into a large pot.  Sprinkle with a bit of cinnamon if you'd like.  Add a little bit of sugar if you want.  ( I often just let each kid put in a teaspoon of sugar.  If the apples are sweet, you really don't even need it, but letting the kids add some sugar seems to make it taste sweeter to them ~ even if it's only a tablespoon for a big pot of sauce!)


4.  Add some water to the pot.  The amount depends on how many apples you use and how big your pot is.  Basically, you just want enough water so the bottom layer of apples are in liquid.  I used about 2 cups for my big pot.


5.  Start cooking your apples over medium heat.  If you do it covered, it cooks a bit faster, but if it's uncovered, the smell of the simmering apples makes your house smell awesome.  I usually put the lid on for part of the time and off for part of the time.


6.  Stir the simmering apples occasionally, adding a bit more water if it starts to get too thick.

7.  Soon, the apples will start breaking down and you'll have some sauce and some apple chunks.  "Softer" apples such as golden delicious and red delicious will usually turn to sauce more quickly.


8.  As the apples begin to soften, use a potato masher to break up the larger chunks.


9.  We like our applesauce just a little bit "chunky", so just the potato masher works fine.  If you want your sauce smoother, you can put it in the blender or food processor.  (I also have one of the immersion blenders that you just stick in the pot which is really easy)  Total cooking time depends a lot on the type of apples you used (some cook a lot faster than others), but it typically takes only about a half an hour or so before you have a yummy batch of delicious homemade applesauce.

That's it!  I let the applesauce cool, then put in individual containers in the fridge.  We usually eat all the applesauce within a week, but Google tells me I can freeze the applesauce, so I may be making some extra batches and keeping them in the freezer.

Sharing this easy recipe at:


October 23, 2011

Crustless Crockpot Pumpkin Pie

I love pumpkin pie, but as I've mentioned before, I'm not much of a baker.  Therefore, I resigned myself to only having my grandmother's pumpkin pie once a year on Thanksgiving.  That is, until I came across this recipe on A Year of Slow Cooking (by the way, GREAT blog for crockpot recipes!!).   It has all the yumminess of a pumpkin pie without the hassle of a crust.  Plus, you make it in the crockpot, so it's even easier.  Ever since I discovered it a couple years ago, it's been a favorite of ours.  Once the leaves start changing and fall is in the air, the kids start asking for it and I happily oblige!

With a little bit of whipped cream, of course!

Here's what you need:

  •  1 can of pumpkin puree (15 oz)
  •  1 can of evaporated milk (12 oz)
  • 3/4 cup white sugar
  • 1/2 cup Biquick mix (or other similar mix)
  • 2 eggs
  • 2 tbsp butter, melted
  • 2 tsp pumpkin pie spice (original recipe calls for the individual spices)
  • 2 tsp vanilla extract


Here's what you do:

1.  Spray the inside of your 4 quart crockpot with cooking spray.  (I've used a 6 quart crockpot with success when I double the recipe)

2.  Put all of your ingredients in a mixing bowl and whisk until fully blended.

3. Pour the batter into the prepared crockpot. Cover and cook on high for about 3 hours, or on low for about 5. Check your "pie" after 2 hours on high, and 3 hours on low, then check every 30 minutes.  You can tell it's ready when the edges are browned and the center no longer "jiggles" when you shake it slightly.  Mine is usually done after about 2 1/2 hours on high.  


This got a little too "browned" on the very edges
because I had to run out to the store for whipped cream,
but it was still really yummy!

4. Let it cool to room temperature, then scoop out and serve with whipped cream.  I actually like the flavors even more after refrigerating it and when it's cool not room temp, but it's yummy either way.


Five (more) Fun Ideas for Halloween and Fall Activities

Fall is finally here 
and Halloween is fast approaching.
Here are a few activities to help your kids 
enjoy this fun time of year.
These ideas linked up 
to our Halloween and Fall parties
are easy to do and inexpensive, 
but still lots of fun.


Leaf People (with cute printable!)
{ Happy Home Fairy }

Make up a bunch of these cute leaf people 
using materials from the dollar store,
then give them out to others
with the cute printable from the post.


Pumpkin Pie Playdoh
{ Dinosaurs and Octopuses }

Here at Come Together Kids we've made
but never Pumpkin Pie Playdoh!
That will change soon because 
this just sounds like it would be awesome!


Hungry Monster People Toss
{ chicken babies }

What a fun idea!
Make a monster with an open mouth
and toss it people to "eat"
(Fisher Price little people and other small people figurines)


Halloween Crayon Rubbings
{ Let Kids Create }

We've tried crayon rubbings before, 
but sometimes it's tough to get a good enough impression.
But, by drawing your picture with hot glue
you get a great raised image that's easier to use ~ brilliant!
( I bet it would be really cool to do with leaf shapes too!)


Colorful Autumn Leaves
{ Boredom Busting Mommy }

Here's a fun activity for even the littlest kid!
Put a leaf shape in a plastic bag with some paint,
seal it up, then let the kids mix the colors.
You'll get colorful fall leaves, but without the mess!!!


I love all these great activities!
Thanks so much for linking up and sharing your great ideas with others.
Feel free to grab a featured button from my sidebar.


And, of course, continue to check out the 
Halloween and Fall Fun parties 
for even more great ideas!

Tatertots and Jello

Tip Junkie handmade projects
Related Posts Plugin for WordPress, Blogger...